
Garmin Connect not only records event data, running data, but this app has countless other lesser-known functions. In this article, we will show you how to use Garmin connect to create a run route yourself. If you want to know how to use and create a route, then immediately review the content below.
This application is suitable for those who like innovation and proactive in training. Because the app will create a whole new route for you, thanks to that, you can control the time, the distance, the number of people running that route. Interesting is not it. Now I take the following steps to create a new route offline:
Step 1. Create a Running Track
Open the Garmin Connect app first, then create a path to run on your phone and website. It would be best if you created both because sometimes when your phone is operating incorrectly, you can still use the web version. In this article, we will also guide you to use Garmin connect based on the web version.
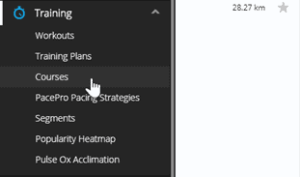
After logging in to Garmin Connect from the list on the right, select “Training” and click on “courses.”
Step 2. Create a Route
Soon you will see the list of routes appears on the screen. If you want to create a new route, click on “Create a Course” in the bottom left corner.
Step 3. Set the Route
Once you have entered the “Create a Course” page, select the route type. Currently, the application supports seven main routes, including Running, Trail Running, Road Cycling, Hiking, Mountain Biking, Gravel/Unpaved Cycling, and Other.
After selecting the route, you use two methods to create “Custom” and “Round Trip”:
- “Round Trip”: This method will automatically create a route with information taken from the Direction and Distance that the user provides. Also, the route will notify you of the places that appear on the road to stay informed when running.
- “Custom”: You will automatically set the desired starting point when making the running route. The map will then display the starting point and the locations you have chosen so the system can create its path.
When creating a route to run on a map, you can also edit a few things with functions like:
- Reverse Direction: Swap the start position and end position. That is, the starting point becomes the ending point, and the ending point becomes the starting point.
- Loop to Start: The application will automatically create the shortest route path for you to return to the starting point. When you select Loop to Start, the shortest distance traveled automatically appears on the route.
- Out and Back: The endpoint will automatically return to the starting point, you must follow the original run an instead of the shortest run. This means that the newly established run route will be restarted, and you must repeat it once.
Step 4. Add Impressions and Adjust the Running Schedule
During the creation process, if you change the way you see it, click the item on the right, such as changing the image displayed from satellites, etc. You can also add items such as displaying the running distance to know. The difference, change the distance from the previous route.
Note that the “HeatMap” software displays the routes of other Garmin Connect users. This indicates whether your running route is empty or crowded so that you will not encounter other people while running on these roads.
Step 5. Complete the Route
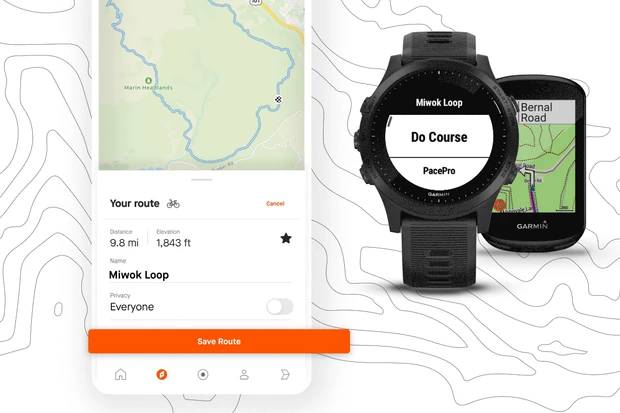
After completing the route, you should check the distance, the up and down segments on the display board in the lower-left corner to see if it is suitable. You can save the newly created route in your section, then download the created route to the watch and use it.
Hopefully, through the tutorial on using Garmin connect, you can create a workout route to run or move to different locations. It can be said that this is an utterly reliable function and not to be missed for athletes, especially for those who specialize in running the forest.